


Beauty enthusiast! Have you ever watched a makeup tutorial and thought, “How do they make their skin look so flawless?” Spoiler alert: it’s not just good genes or expensive foundation. Nope, the real MVP behind that airbrushed perfection is often a humble little tool—the makeup sponge blender. If you’re still brushing on your foundation with fingers or a crusty old brush (no judgment!), you’re about to discover why this squishy gem deserves a spot in your makeup bag. Seriously, it’s a game-changer, and I’m pumped to spill all the details.
So, what’s the big deal? A makeup sponge blender is your ticket to seamless, streak-free application—whether it’s foundation, concealer, or even a pop of cream blush. It’s like having a mini airbrush in your hand, minus the hefty price tag. And with so many options out there (hello, Beautyblender and Real Techniques!), there’s one perfect for you. I remember my first time using one—total rookie move, didn’t even dampen it—and yet, my makeup still looked better than ever. By the end of this post, you’ll be ready to snag the best makeup sponge blender for your routine and blend like a pro. Let’s dive in!
- What is a Makeup Sponge Blender?
- Why You’ll Love Using a Makeup Sponge Blender
- How to Use a Makeup Sponge Blender Like a Pro
- Step 1: Prep Your Sponge
- Step 2: Apply Your Product
- Step 3: Bounce, Don’t Drag
- Step 4: Build and Blend
- Pro Tips
- Types of Makeup Sponge Blenders: Which One’s Right for You?
- Shapes
- Materials
- How to Pick the Perfect Makeup Sponge Blender
- The Best Makeup Sponge Blenders You Can Buy Right Now
- 1. Beautyblender Original
- 2. Real Techniques Miracle Complexion Sponge
- 3. EcoTools Perfecting Blender Duo
- 4. AOA Studio Paw Paw Sponge
- 5. Juno & Co. Microfiber Sponge
- Keep Your Makeup Sponge Blender in Tip-Top Shape
- Wrapping It Up: Blend Like a Pro Today!
- FAQ: Your Makeup Sponge Blender Questions, Answered
What is a Makeup Sponge Blender?
Alright, let’s start with the basics. A makeup sponge blender is a soft, bouncy tool designed to apply and blend makeup products—think liquids, creams, and even some powders. It’s typically egg-shaped or teardrop-shaped, with a texture that feels like a marshmallow had a baby with a cloud. The idea? Dab, bounce, and blend your way to a flawless finish. No streaks, no harsh lines—just pure, natural-looking magic.
These sponges hit the beauty scene big-time thanks to brands like Beautyblender, which basically invented the category (fun fact: it launched in 2003 and sparked a revolution!). Since then, tons of brands—Real Techniques, EcoTools, you name it—have jumped on board, offering affordable dupes and unique twists. Whether you’re a makeup newbie or a seasoned pro, this little tool makes application feel effortless. Plus, it’s way more forgiving than brushes when you’re in a rush—or, let’s be real, running on three hours of sleep.
Why You’ll Love Using a Makeup Sponge Blender
Okay, but why should you ditch your old ways for a makeup sponge blender? Here’s the scoop—straight from someone who’s been there, blended that.
- Seamless Blending: Brushes can leave streaks, and fingers? They’re a cakey mess waiting to happen. A sponge blends everything into your skin like it’s meant to be there.
- Versatility: Foundation? Check. Concealer? Yup. Cream contour, blush, even setting powder? Oh, it can handle it all.
- Natural Finish: Want that “I woke up like this” glow? The sponge’s bouncy texture mimics an airbrush effect—without the fancy equipment.
- Hygienic: Unlike brushes that hoard bacteria (ew), sponges are easy to clean and keep fresh.
- Budget-Friendly: You don’t need to break the bank—there are amazing options at every price point.
I’ll never forget the first time I swapped my flat foundation brush for a sponge. My jaw dropped—my skin looked alive, not like I’d plastered on a mask. If you’re tired of fighting your makeup, this is your sign to give it a whirl.
How to Use a Makeup Sponge Blender Like a Pro
Ready to get blending? Using a makeup sponge blender is super simple, but there’s a knack to it. Here’s your step-by-step guide—trust me, I’ve made all the mistakes so you don’t have to.
Step 1: Prep Your Sponge
First things first—dampen it. Run your sponge under water, then squeeze out the excess until it’s just moist, not dripping. Why? A wet sponge blends better, prevents product waste, and gives you that dewy finish. I learned this the hard way—dry sponge equals patchy foundation. Yikes.
Step 2: Apply Your Product
Dot your foundation, concealer, or whatever you’re using onto your face—cheeks, forehead, chin, under eyes. Less is more here; you can always build up.
Step 3: Bounce, Don’t Drag
Here’s the magic trick: bounce the sponge against your skin. Use the round end for big areas like cheeks and the pointed tip for nooks like under your eyes or around your nose. Don’t swipe or drag—that’s how you get streaks. Bounce, bounce, bounce. It’s oddly satisfying, too.
Step 4: Build and Blend
Need more coverage? Add a little more product and keep bouncing. For concealer, I like to press gently—it hides dark circles like a dream. Finish with a light dusting of powder if you’re oily, and boom—flawless.
Pro Tips
- Dampen, Always: Dry sponges soak up too much product. Wet is best.
- Clean as You Go: Spot-clean between uses to avoid a bacteria party.
- Experiment: Try it with cream blush or bronzer—game-changer alert!
Once you get the hang of it, you’ll wonder how you ever survived without one.
Types of Makeup Sponge Blenders: Which One’s Right for You?
Not all makeup sponge blenders are created equal. Shapes, materials—they all play a role. Let’s break it down.
Shapes
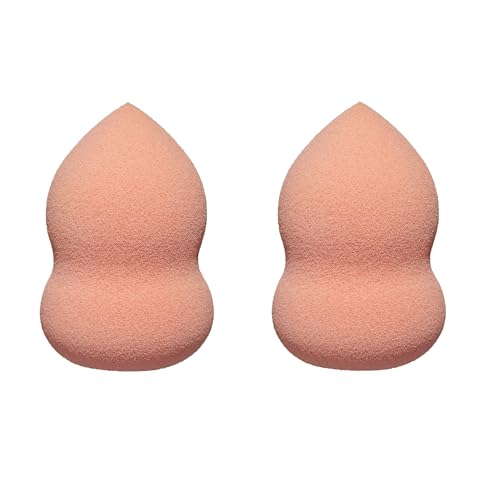
- Egg-Shaped: The classic—like the Beautyblender. Rounded for broad areas, pointed for precision.
- Teardrop: Similar to egg-shaped but slimmer—great for tight spots.
- Flat-Edged: Perfect for contouring or baking powder under eyes.
- Wedge: Old-school vibes, awesome for sharp lines or quick fixes.
Materials
- Foam: Soft, absorbent, and bouncy—the gold standard for blending.
- Silicone: Non-absorbent, so no product waste. My oily-skinned friend swears by it, but I find it tricky to blend.
- Antimicrobial: Treated to fight bacteria—ideal if you’re prone to breakouts.
Each has its quirks. Foam’s my go-to for that airbrushed look, but silicone’s worth a shot if you hate wasting foundation. Shapes? Depends on your routine—egg-shaped is a safe bet for most.
How to Pick the Perfect Makeup Sponge Blender
With so many options, choosing a makeup sponge blender can feel overwhelming. Don’t sweat it—here’s what to consider.
- Skin Type: Oily? Go for antimicrobial or silicone. Dry? Stick with soft foam for hydration-friendly blending.
- Makeup Type: Liquids and creams love foam; powders pair better with flatter sponges.
- Budget: You can snag a great one for under $10—or splurge on a $20 Beautyblender if you’re feeling fancy.
- Shape Preference: Love precision? Pick a pointed tip. All about speed? Go big and round.
For me, it’s all about that soft foam egg shape—versatile and foolproof. But if you’re a contour queen, a flat edge might be your soulmate. Think about your needs, and you’ll find “the one.”
The Best Makeup Sponge Blenders You Can Buy Right Now
Ready to shop? Here are my top picks for makeup sponge blenders that’ll elevate your routine. Prices vary by region, so I’ve linked them to Amazon.com, Amazon.co.uk, and Amazon.ca for you to check out.
1. Beautyblender Original
- Why It Rocks: The OG. Super soft, blends like a dream, and lasts forever if you care for it.
- Downside: Pricey—around $20.


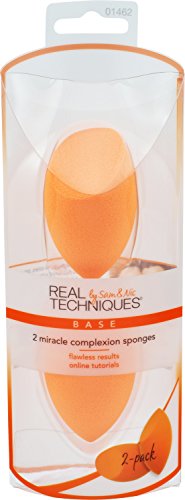
2. Real Techniques Miracle Complexion Sponge
- Why It Rocks: Flat edge for contouring, affordable (under $10), and just as good as pricier options.
- Downside: Wears out faster than some.


3. EcoTools Perfecting Blender Duo
- Why It Rocks: Two sizes for versatility, eco-friendly, and budget-friendly (around $12 for the pair).
- Downside: Less bouncy than premium brands.


4. AOA Studio Paw Paw Sponge
- Why It Rocks: Dirt cheap (like $2!), cute shape, and shockingly effective.
- Downside: Durability’s iffy—replace often.


5. Juno & Co. Microfiber Sponge
- Why It Rocks: Velvety microfiber cuts product waste, blends fast—perfect for busy mornings.
- Downside: Feels different than foam; takes getting used to.


These are my faves after testing way too many (my bathroom drawer’s a sponge graveyard). Grab one—or two—and see the difference for yourself!
Keep Your Makeup Sponge Blender in Tip-Top Shape
Your makeup sponge blender isn’t immortal—sorry to break it to you. But with a little TLC, it’ll last longer and keep your skin happy.
- Clean It: Wash weekly with soap and warm water. I use baby shampoo—gentle and effective. Squeeze, rinse, repeat till the water runs clear.
- Dry It: Air-dry in a ventilated spot. Tossing it wet into a drawer? Recipe for mold. Gross.
- Store It: Keep it in a clean, dry container—not your makeup bag with old mascara crumbs.
- Replace It: Every 3-6 months, or sooner if it’s torn or smelly. Trust your nose on this one.
I once let a sponge go too long—let’s just say the funky smell was a wake-up call. Clean it, love it, and it’ll love you back.
Wrapping It Up: Blend Like a Pro Today!
So, there you have it—everything you need to know about makeup sponge blenders and why they’re your new must-have. From seamless blending to picking the perfect one, you’re armed with the know-how to slay your makeup routine. Whether you’re team Beautyblender or vibing with a budget find, this little tool will transform your face from “meh” to “whoa” in minutes.
Your skin—and your selfies—will thank you. Happy blending, gorgeous!
FAQ: Your Makeup Sponge Blender Questions, Answered
Got questions? I’ve got answers.
Q: Can I use a makeup sponge blender with powder?
A: Yup! Dampen it lightly and bounce setting powder into your skin—great for baking under eyes.
Q: How often should I clean my sponge?
A: Weekly, at least. Daily spot-cleaning’s a bonus if you’re using it a lot.
Q: What’s better—sponge or brush?
A: Depends. Sponges win for a natural finish; brushes are ace for precision. I say try both!
Q: Do expensive sponges really make a difference?
A: Sometimes. High-end ones like Beautyblender feel softer and last longer, but dupes can be just as good for less.
