


Beauty lover! Have you ever stared in the mirror, foundation streaked like a bad art project, wondering how influencers get that perfect, airbrushed glow? I’ve been there—trust me. Then I discovered sponge applicator makeup, and let me tell you, it’s a total game-changer. These little tools are like magic wands for your face, making application a breeze and leaving you with a finish that’s smooth as silk.
So, what’s the big deal? Sponge applicators are all about simplicity and results. Whether you’re a makeup newbie fumbling with brushes or a pro looking to level up, they’re here to make your life easier. In this guide, we’re diving deep into everything you need to know—why they rock, how to use them, and where to snag the best ones (hint: Amazon’s got you covered). Ready to transform your beauty routine? Let’s jump in!
- What is a Sponge Applicator, Anyway?
- Why It Matters
- Benefits of Using Sponge Applicators: Why You’ll Be Obsessed
- Types of Sponge Applicators: Find Your Perfect Match
- 1. Teardrop-Shaped Sponges
- 2. Wedge-Shaped Sponges
- 3. Flat Sponges
- 4. Silicone Sponges
- 5. Mini Sponges
- How to Use a Sponge Applicator: Your Step-by-Step Glow-Up
- Choosing the Right Sponge Applicator for You
- Conclusion: Your Flawless Future Awaits
- FAQ: Quick Answers to Your Burning Questions
What is a Sponge Applicator, Anyway?
The Basics of This Beauty Essential
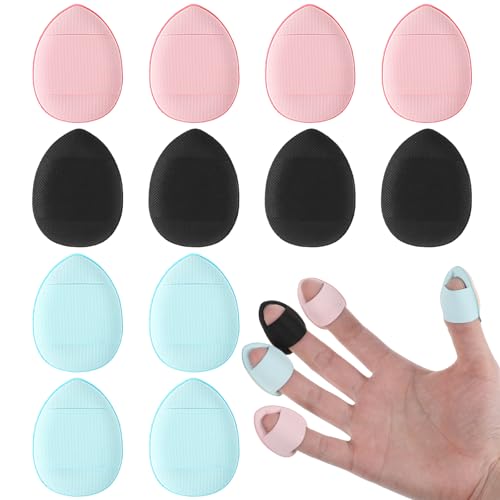
Alright, let’s start simple. A sponge applicator—sometimes called a makeup sponge or beauty blender—is a soft, squishy tool designed to apply and blend makeup like a dream. Think of it as your skin’s best friend. Unlike brushes with their bristly vibes or fingers that leave smudges, these sponges are made from materials like foam, silicone, or latex-free goodness. They come in all sorts of shapes and sizes, each with a special superpower for your makeup game.
The classic? That teardrop shape you’ve probably seen everywhere. But there’s more—wedges, flats, even mini versions. They’re built to tackle foundation, concealer, powder, you name it. And the best part? They don’t require a cosmetology degree to use. If you can dab and bounce, you’re golden.
Why It Matters
Sponge applicators aren’t just tools; they’re a shortcut to flawless. They blend like nobody’s business, giving you that “I woke up like this” look without the hassle. Intrigued? Stick with me—we’re about to unpack why they’re a must-have.
(Visual Idea: Picture a lineup of sponge shapes—teardrop, wedge, flat—labeled with their uses. Alt text: “Different sponge applicator shapes for makeup application.”)
Benefits of Using Sponge Applicators: Why You’ll Be Obsessed
Okay, let’s get to the good stuff. Why should you toss a sponge applicator into your makeup bag? Spoiler: it’s not just hype. Here’s what makes them amazing:
- Dummy-Proof Application: New to makeup? No stress. These sponges are so easy, you’ll wonder why you ever struggled with brushes. Just dab and go.
- Flawless Finish: They blend like a dream, smoothing out foundation and concealer so you don’t look like you’re wearing a mask. Bye-bye, cakey disasters.
- Multi-Tasking Magic: Use them for liquid foundation, cream blush, powder—even skincare if you’re feeling fancy. One tool, endless possibilities.
- Clean Vibes: Keep ‘em washed, and they’re more hygienic than brushes. No bristle bacteria party here.
- Control Freak Approved: Need more coverage? Dab on extra product and build it up. Want sheer? Go light. You’re the boss.
- Natural Glow: Forget fingerprints or brush streaks. Sponges give you that airbrushed look everyone’s chasing.
I’ll be real—I was skeptical at first. But after one try, I was hooked. My foundation went from “meh” to “whoa” in five minutes flat. Whether you’re rushing out the door or going full glam, a sponge applicator’s got your back.
Types of Sponge Applicators: Find Your Perfect Match
Not all sponges are the same, and that’s a good thing! Here’s the rundown on the most popular types and what they’re best for:
1. Teardrop-Shaped Sponges
- What’s Up: The OG beauty blender style—pointy tip, rounded bottom.
- Best For: All-over foundation and concealer. The tip hits tight spots like under your eyes, while the base covers cheeks like a pro.
- Why You’ll Love It: It’s the do-it-all champ. Think seamless coverage, every time.
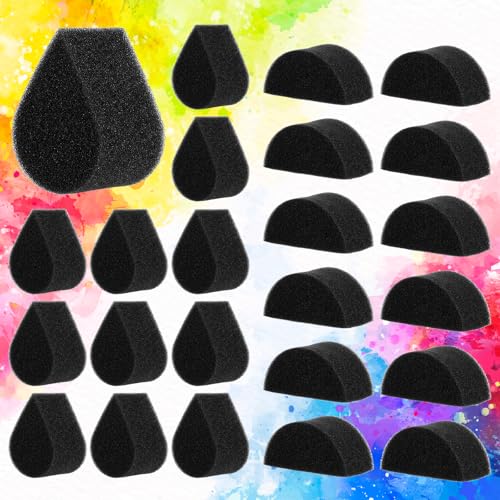

2. Wedge-Shaped Sponges
- What’s Up: Triangular with sharp edges for precision.
- Best For: Contouring, blending concealer, or getting into tricky corners like around your nose.
- Why You’ll Love It: Those edges are clutch for sculpting your face like a makeup artist.


3. Flat Sponges
- What’s Up: Thin and wide, sometimes with a velvety feel.
- Best For: Powder or cream products—think setting powder or cream blush.
- Why You’ll Love It: Presses product in for a smooth, polished vibe.

4. Silicone Sponges
- What’s Up: Slick, non-porous silicone that doesn’t soak up a drop.
- Best For: Liquid or cream makeup when you want to save product.
- Why You’ll Love It: Zero waste, easy cleanup. Though blending’s a bit less dreamy than foam.


5. Mini Sponges
- What’s Up: Tiny but mighty.
- Best For: Detail work—eyeshadow, highlighter, or quick touch-ups.
- Why You’ll Love It: Perfect for travel or precision obsessed peeps.


Picking the right one depends on your vibe. Liquid foundation lover? Go teardrop. Contouring queen? Wedge it up. There’s a sponge for every mood—and we’ll talk about choosing yours soon.
How to Use a Sponge Applicator: Your Step-by-Step Glow-Up
Ready to get hands-on? Using a sponge applicator is a cinch, but a little know-how goes a long way. Here’s how to slay your foundation game:
Step-by-Step Guide
- Prep Your Canvas: Clean, moisturized skin is key. Slap on primer if that’s your jam.
- Wet It Down: Dampen your sponge with water—squeeze out the extra so it’s not dripping. This makes it puff up and stops it from guzzling your makeup.
- Dot It On: Put foundation on your face (cheeks, forehead, chin) or dip the sponge into it. Less mess, more control.
- Bounce, Don’t Drag: Use a stippling motion—little bounces—to blend it in. Start at the center, work outward. No streaks allowed.
- Layer Up: Need more coverage? Dab on extra where you want it—blemishes, dark circles, whatever—and blend again.
- Lock It In: Grab some setting powder, press it in with the sponge for staying power.
Pro Tips to Level Up
- Concealer Hack: Use the sponge’s tip to blend under your eyes or around your nose. Flawless in seconds.
- Cleaning 101: Wash it with soap and water after every use. Let it air dry—no moldy sponges here.
- Silicone Switch: If you’re rocking a silicone sponge, pat—don’t bounce—for even coverage.
I remember my first time—rushing for a date, foundation patchy, panic setting in. Grabbed a damp sponge, bounced it on, and boom—saved the day. With a little practice, you’ll be a blending ninja too.
Choosing the Right Sponge Applicator for You
So many sponges, so little time. How do you pick the one? Here’s what to think about:
- Skin Type: Sensitive? Go latex-free to dodge irritation. Oily? Silicone’s your buddy—it won’t soak up excess shine.
- Makeup Style: Liquid foundation fiend? Teardrop’s your go-to. Powder queen? Flat sponges rule.
- Wallet Check: You can snag drugstore steals or splurge on high-end brands. Quality matters, but there’s gold at every price point.
- Brand Buzz: Check reviews—some names (like that famous pink egg) have cult followings for a reason.
- Planet Points: Eco-warrior? Skip disposables for reusable or biodegradable options.
Here’s a personal tidbit: I’ve got combo skin—oily T-zone, dry cheeks—and a teardrop sponge changed my life. No more flaky patches or shiny foreheads. Find what clicks for you, and you’re set.
Conclusion: Your Flawless Future Awaits
There you go, gorgeous—the full scoop on sponge applicator makeup. We’ve covered what they are, why they’re awesome, the types to try, how to use ‘em, and where to grab the best ones. These little gems make blending a breeze, save time, and leave you looking like a million bucks without the effort.
So, what’s next? Ditch the streaky brushes and patchy fingers. A sponge applicator’s your ticket to effortless beauty. Your skin’s about to glow like never before!
FAQ: Quick Answers to Your Burning Questions
- How often should I clean my sponge?
Every use, babe. Soap, water, air dry—keep it fresh. - Can sponges handle powder?
Totally! Flat ones are ace for powder; teardrops work too. - Sponge vs. brush—what’s the deal?
Sponges blend for a natural vibe; brushes nail precision. Pick your poison.
