Beauty lovers! Have you ever stared in the mirror, foundation brush in hand, wondering why your makeup looks more like a mask than a masterpiece? Or maybe you’ve dreamed of that flawless, dewy glow you see on Instagram—without needing a pro makeup artist on speed dial. Well, I’ve got a little secret for you, and it’s probably already hiding in your makeup bag: the wet makeup sponge. Yep, this unassuming little tool might just be the game-changer your routine’s been begging for.
I’ll let you in on something personal—I used to be a dry-sponge skeptic. Big mistake. The first time I tried a damp sponge, my foundation blended so seamlessly I nearly cried (happy tears, of course). It’s like the difference between instant coffee and a barista-made latte. So, if you’re ready to level up your makeup game and snag that hydrated, airbrushed look, stick with me. Let’s get glowing!
- What’s a Wet Makeup Sponge, Anyway?
- A Little Backstory
- Why Wet Makeup Sponges Are a Total Game-Changer
- How to Use a Wet Makeup Sponge Like a Pro
- Pro Tips to Nail It
- Mistakes to Skip
- Picking the Perfect Wet Makeup Sponge
- Shape Matters
- Material Check
- Price Point
- My Top Amazon Picks
- Keeping Your Wet Makeup Sponge Fresh
- Wrap-Up: Your Flawless Look Awaits!
What’s a Wet Makeup Sponge, Anyway?
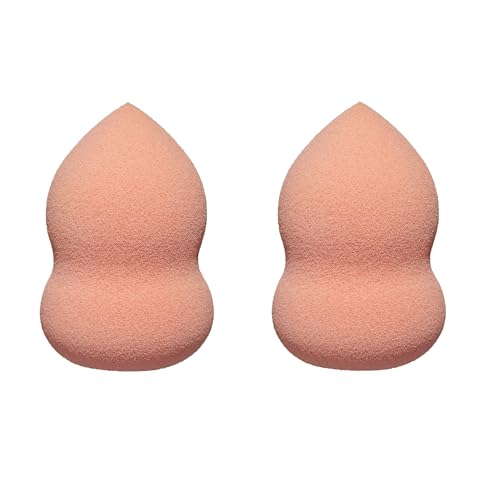
So, let’s start with the basics. A wet makeup sponge is a soft, squishy tool—think BeautyBlender or its many cousins—that you dampen with water before using it to apply or blend makeup. Unlike a dry sponge (which, let’s be honest, can suck up half your foundation and leave you streaky), a wet sponge gives you a smooth, hydrated finish. It’s perfect for liquid or cream products like foundation, concealer, or even blush.
A Little Backstory
Makeup sponges aren’t new, but the wet method? That’s a modern twist. The trend exploded when the BeautyBlender hit the scene in 2003, created by makeup artist Rea Ann Silva. She figured out that a damp sponge could blend foundation like a dream, and suddenly, everyone from Hollywood pros to everyday beauty buffs was obsessed. Now, wet makeup sponges are a must-have for anyone chasing that flawless finish.
Why does it matter? Because it’s not just a tool—it’s a tiny revolution for your face. And trust me, once you go wet, you’ll never go back.
Why Wet Makeup Sponges Are a Total Game-Changer
Alright, let’s talk benefits. Why should you ditch the dry sponge (or that crusty old brush) and grab a wet one? Here’s the scoop:
- Hydrated, Dewy Vibes: The dampness adds a touch of moisture, making your makeup melt into your skin instead of sitting on top like a heavy mask. Hello, natural glow!
- Blending Bliss: That bouncing motion (we’ll get to that) blends everything seamlessly—especially around the nose, eyes, and jawline. No more harsh lines.
- Save Your Products: A wet sponge doesn’t hog your foundation like a dry one does. You’ll use less and still look amazing.
- Works for Everyone: Dry skin? Oily skin? Combo chaos? Doesn’t matter—a wet makeup sponge adjusts to your needs.
Here’s a quick story: I used to wrestle with dry patches that made my foundation look flaky. Switching to a wet sponge was like waving a magic wand—suddenly, my skin looked hydrated and happy, even on zero-sleep days. If that’s not a win, I don’t know what is.
How to Use a Wet Makeup Sponge Like a Pro
Okay, you’re sold on the idea—but how do you actually use this thing? Don’t worry, it’s easier than it sounds. Here’s your step-by-step guide:
- Get It Wet: Run your sponge under water until it’s soaked, then squeeze out the excess. It should be damp, not dripping—like a wrung-out towel.
- Add Your Makeup: Dot some foundation or concealer on your face, or dab it right onto the sponge. Less is more—you can always build up.
- Bounce It: Use a gentle stippling motion (aka bouncing) to press the product into your skin. No swiping—that’s how streaks happen.
- Blend, Blend, Blend: Focus on tricky spots like under your eyes or along your jawline. Keep bouncing ‘til it’s flawless.
- Finish Up: Want a matte look? Dust on some powder. Prefer dewy? You’re done!
Pro Tips to Nail It
- Pointy End for Precision: Use the tip for tiny areas like around your nose or covering a zit.
- Damp, Not Drenched: Too much water dilutes your makeup—squeeze it good.
- Experiment: Try it with cream blush or contour for extra versatility.
Mistakes to Skip
- Going Dry: A dry sponge is a no-go—it’ll drag and waste product.
- Over-Soaking: If it’s dripping, you’ve gone too far.
- Rubbing: Bounce, don’t rub, unless you want a streaky mess.
The first time I tried this, I over-soaked my sponge and ended up with foundation soup. Lesson learned: a quick squeeze is your friend.
Picking the Perfect Wet Makeup Sponge
Not all sponges are created equal, and with so many out there, how do you choose? Let’s break it down:
Shape Matters
- Egg-Shaped: Your go-to for all-over coverage. The classic.
- Flat-Edged: Awesome for contouring or baking powder.
- Mini Sponges: Perfect for concealer or spot fixes.
Material Check
- Latex-Free: A must if your skin’s sensitive.
- Antimicrobial: Keeps bacteria at bay (because nobody wants a breakout).
Price Point
You don’t need to splurge—there are killer options at every budget. That said, a good sponge is worth its weight in gold (or at least in foundation).
My Top Amazon Picks
Ready to shop? Here are my fave wet makeup sponges, available on amazon.com, amazon.uk, and amazon.ca. (Full disclosure: these are affiliate links, so I might earn a tiny commission if you buy—no extra cost to you!)
BeautyBlender Original
The OG. Its squishy texture and egg shape make blending a breeze.
Real Techniques Miracle Complexion Sponge
Budget-friendly but pro-level. Works with liquids and powders.
EcoTools Perfecting Blender Duo
Two eco-friendly sponges—one big, one small. Sustainable and fab.
These are my ride-or-dies—seriously, your makeup will thank you.
Keeping Your Wet Makeup Sponge Fresh
A great sponge deserves great care. Here’s how to keep it in tip-top shape:
- Clean It: After a few uses, wash it with mild soap and warm water. Squeeze out the gunk ‘til it’s clear. I do mine in the shower—multitasking FTW.
- Dry It: Let it air-dry somewhere ventilated. No damp drawers—mold’s not cute.
- Replace It: Every 3-4 months, toss it. If it’s crumbling or smells weird, it’s toast.
I learned this the hard way after leaving a sponge in a makeup bag for too long. Let’s just say it wasn’t pretty—or hygienic.
Wrap-Up: Your Flawless Look Awaits!
So, there you have it—the full rundown on why wet makeup sponges are your ticket to a hydrated, flawless complexion. They blend like a dream, save your products, and make you look like you just stepped out of a beauty ad—all with minimal effort. Whether you’re new to makeup or a seasoned pro, this little tool is about to become your BFF.
Ready to glow? Head to Amazon and snag one of my top picks—your mornings (and your selfies) will never be the same.


